Friday, 14 February 2014

Everything You Need to Know About Rooting Your Android Phone


We love Android, but rooting your phone can give you the opportunity to do so much more than your phone can do out of the box—whether it's wireless tethering, speeding it up with overclocking, or customizing the look of your phone with themes. Here's what you need to know about the rooting process, and where to find a guide for your phone.P
Update: This used to be our always up-to-date rooting guide, which proved to be too large an undertaking for us to keep up. It was a nice try, but seeing as we only have a few Android phones to test, we couldn't reliably keep it up to date. So, we've changed this guide into more of a general resource for those of you that want to get into rooting (though many of the old comments still remain).
Check out the glossary below to get acquainted with important rooting terms, then check out the FAQ for more info on your burning questions. When you're ready, check out the last section for resources on your specific device. We can't give you the instructions ourselves, but hopefully we can give you a push in the right direction and make the process easier for you.

What Is Rooting, Exactly?

Rooting, for those of you that don't know, means giving yourself root permissions on your phone. It's similar running programs as administrators in Windows, or running a command with sudo in Linux. With a rooted phone, you can run apps that require access to certain system settings, as well as flash custom ROMs to your phone, which add all sorts of extra features. If you're on the fence about rooting, check out our top 10 reasons to root your Android phone for some motivation.
There are a ton of different Android phones out there, and while some rooting methods might work for multiple phones, there is no one-size-fits-all guide for rooting every phone out there. But, there are a lot of things you should know about rooting before you start, and this guide should help you out.

Glossary of Rooting TermsP

Everything You Need to Know About Rooting Your Android Phone
As you learn more about the rooting process, you'll probably run into a bunch of terms that can be confusing. Here are some of the most important ones and what they mean.P
If there are any other terms you think we should add, let me know and we'll put them in!P
  • Root: Rooting means you have root access to your device—that is, it can run the sudocommand, and has enhanced privileges allowing it to run apps like Wireless Tether orSetCPU. You can root either by installing the Superuser application or by flashing a custom ROM that includes root access.P
  • ROM: A ROM is a modified version of Android. It may contain extra features, a different look, speed enhancements, or even a version of Android that hasn't been released for your phone yet. We won't discuss ROMs in depth here, but if you want to use one once you're rooted, you can read more about doing that here.P
  • Kernel: A kernel is the component of your operating system that manages communications between your software and hardware. There are a lot of custom kernels out there for most phones, many of which can speed up your phone and increase your battery life, among other things. Be careful with kernels, though, as a bad one can cause serious problems with your phone and possibly even brick it.P
  • Radio: Radios are part of your phone's firmware. Your radio controls your cellular data, GPS, Wi-Fi, and other things like that. You can sometimes find custom radios for your phone that you can flash yourself, but beware as sometimes these can cause problems.P
  • Flash: Flashing essentially means installing something on your device, whether it be a ROM, a kernel, or a recovery (see below) that comes in the form of a ZIP file. Sometimes the rooting process requires flashing a ZIP file, sometimes it doesn't.P
  • Brick: To brick your phone is to break it during flashing or other acts. There is always a small risk with flashing, and if your phone becomes unable to function—that is, it basically becomes a brick—you've bricked your phone. The risk is very small, however, and more often than not people say "brick" when they really mean "it turns on but doesn't boot properly," which is a very fixable problem. See the FAQ below for more information.P
  • Bootloader: Your bootloader is the lowest level of software on your phone, running all the code that's necessary to start your operating system. Most bootloaders come locked, meaning you can't flash custom recoveries or ROMs. Unlocking your bootloader doesn't root your phone directly, but it does allow you to root and/or flash custom ROMs if you so desire.P
  • Recovery: Your recovery is the software on your phone that lets you make backups, flash ROMs, and perform other system-level tasks. The default recovery on your phone can't do much, but you can flash a custom recovery—like ClockworkMod or TWRP—after you've unlocked your bootloader that will give you much more control over your device. This is often an integral part of the rooting process.P
  • Nandroid: From most third-party recovery modules, you can make backups of your phone called nandroid backups. It's essentially a system image of your phone: Everythingexactly how it is right now. That way, if you flash something that breaks your phone, you can just flash back to your most recent nandroid backup to return everything to normal. This is different from using an app like Titanium Backup that just backs up apps and/or settings—nandroid backups backup the entire system as one image. Titanium backups are best when switching between ROMs or phones.P
  • ADB: ADB stands for Android Debug Bridge, and it's a command line tool for your computer that can communicate with an Android device you've connected to it. It's part of the Android Software Developers Kit (SDK). Many of the root tools you'll find use ADB, whether you're typing the commands yourself or not. Unless the instructions call for installing the SDK and running ADB commands, you won't need to mess with it—you'll just need to know that it's what most of the tools use to root your phone.P
  • S-OFF: HTC phones use a feature called Signature Verification in HBOOT, their bootloader. By default, your phone has S-ON, which means it blocks you from flashing radio images—the code that manages your data, Wi-Fi, and GPS connections. Switching your phone to S-OFF lets you flash new radios. Rooting doesn't require S-OFF, but many rooting tools will give you S-OFF in addition to root access, which is nice.
  • RUUSBF, and OPS: ROM Upgrade Utilities (for HTC phones), System Boot Files (for Motorola phones), and OPS and PIT files (for Samsung phones) are files direct from the manufacturer that change the software on your phone. RUU and SBF files are how the manufacturers deliver your over-the-air upgrades, and modders often post leaked RUU and SBF files for flashing when the updates haven't been released yet. They're also handy when downgrading your phone, if a rooting method isn't available for the newest software version yet. You can flash RUUs right from your HTC phone, but Motorola users will need a Windows program called RSD Lite to flash SBF files, and Samsung users will need a tool called Odin to flash OPS and PIT files (note there is a specific version of Odin for each device).
Read More

Market Helper Enables Incompatible Apps on Rooted Android Phones

Market Helper Enables Incompatible Apps on Rooted Android Phones
Android (rooted): Every once in awhile, you hit up the Play Store only to find that the app you want "isn't compatible with your device." Want to try it anyway? Market Helper gives you the power to do so.P
Sometimes, apps are incompatible just because they weren't made or tested on your device, or because they have a few bugs (but are otherwise usable). This isn't always the case, but it can happen. If you've got your mind set on trying that app, Market Helper will let you "spoof" your device so the Play Store sees it as another phone, tablet, carrier, or region. Just open it up, choose a device for which the app is compatible, and head back to the Play Store. You should find that app is available to download and install. Whether it works, of course, is another story.P
When you're done, you can either reboot your phone or head back into Market Helper to restore your device to its original settings.P
As always, be careful with apps like this. You may experience problems if you install something you aren't supposed to, so do so at your own risk. Be sure to check out the app's home page, too, for information on permissions and other technical stuff.P
Read More

Thursday, 13 February 2014

How to Block a Phone Number From Calling Your Android Phone


block-spam-phone-calls-on-android
Blocking a phone number from calling you should be fairly simple in 2013, but it still isn’t.
Android doesn’t have a completely integrated blocking solution, and carriers don’t
generally offer this basic service for free.
Luckily, there are a variety of ways to block calls anyway, whether you’re dealing with
telemarketers that won’t stop calling or other annoying people that just won’t leaveyou alone.

Integrated Phone Number-Blocking Options

Google doesn’t build the capability to block calls into Android. However, some
manufacturers add this feature to their custom skins. For example, some Samsung phones
include this feature.
To use this feature, open the Phone app on a Samsung phone, tap the Menu button, and
navigate to Call settings -> Call rejection -> Auto reject list. You can check the Unknown
option to automatically reject all calls from “Unknown” numbers or tap the Create button
and add individual phone numbers you want to block to the list.

Silence Calls or Send Calls to Voicemail

Android does provide a way to have specific numbers always go to your voicemail or play
a silent ringtone that won’t disturb you if your phone is in your pocket.
If you set up this feature, you may still end up with voicemails from the number. However,
if they’re a telemarketer, they likely won’t leave you a voicemail — so this feature may be
more than good enough for blocking the most annoying telemarketers. If someone’s
constantly leaving you voicemail messages, this won’t stop them.
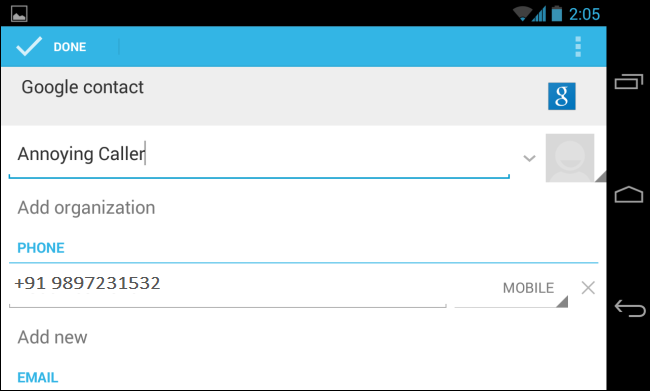
To use this feature, just add the number you want to block to your contacts. You can do
this by opening the Dialer app, swiping over to the history tab, and tapping the number.
Tap
the Add to contacts option and the number will be added to your phone’s contacts.

Go through the contact-adding process and name the contact. You could also add a
contact manually, not from the dialer — just ensure the contact is associated with the
phone number you want to block.


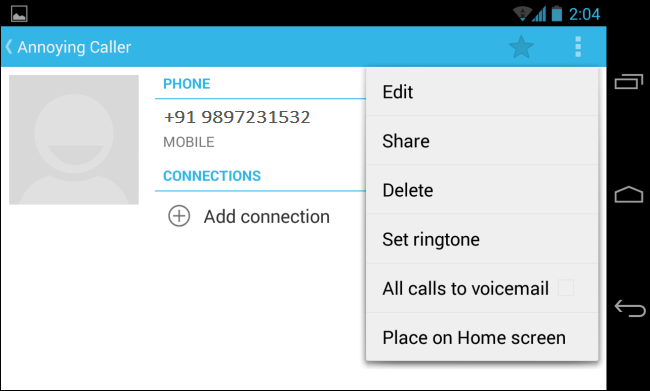
Once you’re done, go into the People app and tap the contact you added. Tap the 
menu button and select All calls to voicemail to automatically send the number’s calls
to 
voice mail or tap Set ringtone and select None to associate the caller with a silent
ringtone.


Block Calls With a Third-Party App

If you actually want to block calls and this feature isn’t integrated into your phone,
you may want to try using a third-party app like Mr. Number. You can use apps like this
one to automatically hang up on calls, effectively blocking them and preventing them
from even getting to your voicemail.
Note that third-party call blocking apps always seem to have some mixed reviews.
They don’t appear to work well for some people, and this may depend on your specific
Android phone. If the above app doesn’t work for you, you may want to try another
call blocking app from Google Play.


Read More

Outlook 2010: How to set out of office in outlook 2010?

Set out of office with Out of Office Assistant using Exchange Account


If you are using an Exchange account, you can auto reply a specified message for the received emails with setting theOut of Office Assistant while you are away. Please do as follows:
1. Click File button in the upper-left corner in outlook 2010, and click Info > Automatic Replies, see screenshot:
2010-out-of-office
Note: If you do not see this Automatic Replies option, your outlook have not connected to an Exchange Server.
2. In the Automatic Replies dialog box, select the Send automatic replies:
  • (1.) Check the Only send during this time range, and then specify the Start time and End time you need to auto reply the message.
  • (2.) Then type your message at the space box.


3. If you want to send auto-reply message to external senders, click on the Outside My Organization tab and check the Auto-reply to people outside my organization option. See screenshot:
4. Click OK to activate the out of office message.

 Set out of office with Manage Rules & Alerts function using other Accounts

If your outlook haven’t connected to an Exchange Server, the above method will not work. In this situation, the Manage Rules & Alerts function of Outlook can help you to set out of office auto reply as following steps:
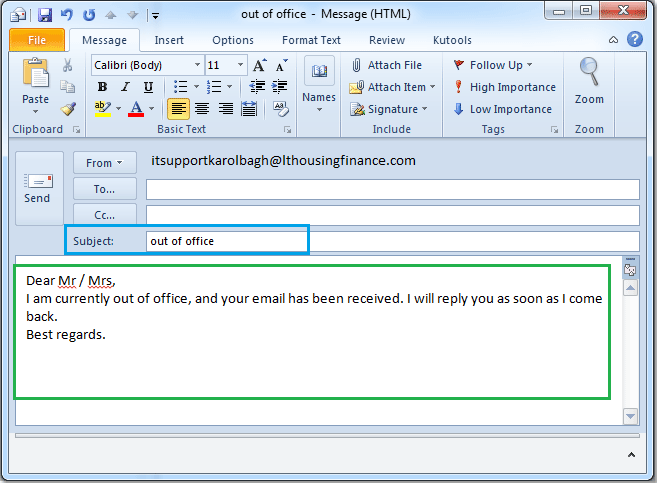
1. Click Home > New E-mail to create a new message, type the subject and message as you need. See screenshot:

2. Then click File > Save As, choose a folder to put the message, and then click Save as type drop down list, and select Outlook Template.
doc-2010-out-of-office5
3. And then click Save to save the message.
4. Then click Home > Rules > Manage Rules & Alerts, see screenshot:
doc-2010-out-of-office6
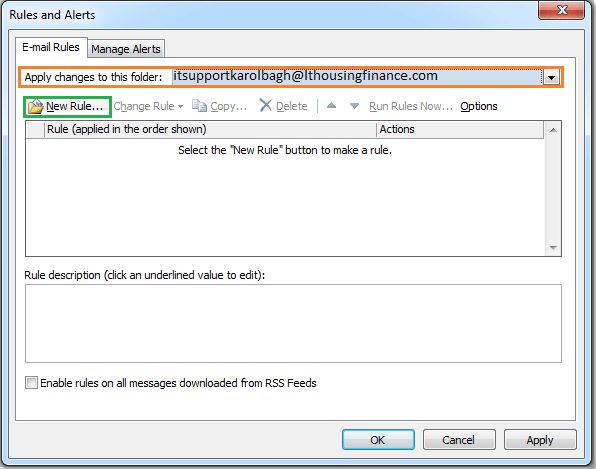
5. In the Rules and Alerts wizard, click E-mail Rules tab, and select the email account that you want to apply the out of office setting from Apply changes to this folder, and then click New Rule.


6. In the Rules Wizard, click Apply rule on message I receive from the Start from a blank rule section.
doc-2010-out-of-office8
7. Click Next button, check sent only to me from Which conditions do you want to check?
doc-2010-out-of-office9
8. Go on clicking Next:
  • (1.) Check reply using a specific template from What do you want to do with the message?
  • (2.) Then click a specific template hyperlink in the Edit the rule description section.
  • (3.) And a Select a Reply Template dialog box will appear, select User Templates in File System from Look indrop down list, and then click Browse button to choose the folder that you put the auto-reply message, and the message you created just now have been inserted. Then click Open to finish this step, see screenshots:
doc-2010-out-of-office10
-1
doc-2010-out-of-office11
9. Go on Next, in this Are there any exceptions step, you needn’t check any item.
doc-2010-out-of-office12
10. And click Next, enter a name for the rule in Step1 section, and specify the rule options as you need in Step2section.
doc-2010-out-of-office13
11. And then click Finish button to finish setting this auto reply rule. And when you receive some emails next time, the Outlook will reply them automatically at once.
Read More

How to Set Out of Office (Auto Reply) in Outlook 2003, 2007, 2010 and 2013

The following instruction is fit for Outlook 2003 and 2007 for both with and without Exchange Server.
It is also fit for Outlook 2010 and 2013 without Exchange Server.
If your email account is connecting to Microsoft Exchange Server, please click here.


Step 1: Create a New mail message. You should type some text in this mail, for example:

Out of Office Auto-reply
Thank you for your email. I’m out of the office and will be back at February 25. During this period I will have Limited access to my email. For immediate assistance please contact me on my cell phone at 123456879.


Step 2: Click File > Save As to save the message as Outlook Template.

Note: The screen shot is fit for Outlook 2003. It is also fit for Outlook 2007 (with Classic Menu for Office installed).

If you are using Outlook 2007 and have not Classic Menu for Office, please click the Office Button on the top-left and select "Save As".

If you are using Outlook 2010/2013 and have not Classic Menu for Office, please click the File tab on the top-left and select "Save As".

Tip: Classic Menu for Office is a standard add-in which shows classic user interface in Office 2007 and 2010.


Step 3: Select "Outlook Template", click Save button.


Step 4: Close the mail message and Click Tools > Rules and Alerts.

Note: The screen shot is fit for Outlook 2003 and 2007. It is also fit for Outlook 2010/2013 (with Classic Menu for Office installed).

if you are using Outlook 2010/2013 and have not Classic Menu for Office, please click the File tab on the top-left, and then click Info > Rules and Alerts..

Tip: Classic Menu for Office is a standard add-in which shows classic user interface in Office 2007 and 2010.


Step 5: Click New Rule.


Step 6: Select Check messages when they arrive and click Next button.


Step 7: Check where my name is in the To box and click Next button.


Step 8: Check reply using a specific template. And then click the label "a specific template" under "Step 2" to select template.


Step 9: Select "User Templates in File System" on the right of "Look In", the template "Out of Office AutoReply" which you saved will be here.

Select it and click Open button.


Step 10: Click Next button.


Step 11: Check except if it is an Out of Office message. Click Next button.


Step 12: Type "Out of Office" in the edit box to regard it as rule name. Click Finish button. it is OK now.


Here you have done. Now when you receive some emails next time, the Outlook will reply them automatically at once......


What is Classic Menu for Office/Outlook


Brings the familiar classic menus and toolbars back to Microsoft Office 2007, 2010 and 2013, helps users get through the transition from Office 2003 (or 2002, 2000) to Office 2007, 2010 or 2013, and saves your money and energy on training if you are upgrading your Office.


Download Here:- 

Classic Menu for Office 2007

Classic Menu for Office 2010 and 2013 (32-bit and 64-bit)


Also Check this one...

How to set out of office in outlook 2010 & 2013?


Read More

Wednesday, 12 February 2014

Online Free MP3 Cutter - Cut your audio files quick and easily


Here is an online application for cutting music. It allows you to effortlessly cut out a desired musical fragment from an MP3 file or a file in other formats, in order, for example to set it up as a customized ringtone for your mobile phone.

The web application is free; it was designed for a single purpose, which makes it easy to use unlike complicated professional audio editors:
  • Just open the file (audio or video)


  • Adjust the interval and click "Cut"


  • Save the track on your computer’s hard drive


Detailed instructions on how to cut a song.

Cut MP3 Instantly

Once you open an MP3 file, you can cut it immediately. This makes it possible to use the application even having a slow Internet connection.Create Your Own iPhone Ringtones.

You can save the fragment you cut in M4R format which is supported by iPhone as a ringtone. More on how to create a ringtone for your iPhone?

Cut Sound from a Video File

If you upload a video file, the cutter will extract the audio track from it. More on how to extract the sound from a video?


Fade-In and Fade-Out functions

This function can be useful when creating ringtones for your mobile phone. The sound will start from silence and gradually become louder within a few seconds. Read more on tips for cutting music.
Support of All Major Audio and Video Formats.


It supports more than 150 audio and video formats including the most rare ones. You can cut files in MP3, WAV, WMA, OGG, M4A, etc. See the full list of supported formats.

Directly Open or  Save Your Files To Google Drive/ Dropbox


You can also try these free online apps


Download Here Offline Software to Convert or Merge Your Media Files:- Format Factory


Read More

Monday, 10 February 2014

Install Android Apps To SD Card Without Rooting

There are many android applications present on Google Play Store
that are capable to move or install apps on SD Card. When installing a new application on Android, it will be automatically installed to the default of internal storage memory. But with a few tricks to install to the default external storage memory (SD card) so we do not need to move it manually. This trick can also move almost all apps to SD card pre-installed on your phone. And most importantly, this is done without rooting on your mobile phone.


Requirements:-

  1. Move all apps from SD Card to phone to prevent loss of data.
  2. Download Java Development Kit (JDK) from here.
  3. Download Android Software Development Kit (SDK) from here and install it on your PC.
  4. Make sure you have installed your device’s USB Drivers on your PC
  5. Enable USB Debugging by going to Settings>Applications>Development and ensure that USB Debugging is checked.
  6. Disable all Anti-Virus and Anti-Security tools and re-enable them after this process.


Setup Android SDKOnce the Android SDK downloaded and installed, open the SDK Manager application from your Start menu. Check the Android SDK Platform-tools and then click the Install button. (Refer Image below)


Enable USB Debugging

To use ADB, the main requirement is USB Debugging should be ON. Open the Settings menu within your Developers (Android 4.xx) and check USB Debugging.


Test Install ADB and Mobile Device Drivers


Navigate your Windows into the Android SDK folder. You can find information on the location in the SDK Manager. For example:


C:\Users\YOUR-NAME\AppData\Local\Android\android-sdk\platform-tools


Inside that folder will be found adb.exe (ADB file). Then press Shift + Right click, select Open command window here.


ADB to test whether it goes as we want, connect your Android device to your computer and input the following command:-

adb devices


Serial number of Android device you should look there. But if not detected, probably because you have not installed the driver.


Run the following command to check the install location of your Android device:

adb shell pm getInstallLocation

or (for ICS version)

adb shell pm get-install-location

The output will be 0[auto] by default. Below are the options you have:


0[auto] : Installation to auto location decided by Android OS

1[internal] : Installation to internal storage of mobile

2[external] : Installation to external media like SD Card


To set SD Card as default install location, run this command:

adb shell pm setInstallLocation 2


or (for ICS version)


adb shell pm set-install-location 2


You can simply unplug your mobile from PC after setting install location to SD Card.

Here you have done....
Read More