Showing posts with label Windows. Show all posts

Tuesday, 25 March 2014

How to Fix Windows 8.1 Update Issues

With any new software update on any device, there are going to be small hiccups, little issues that cause users to not be able to download the update even though they should be able to. Windows 8.1, the free update for tablets, desktops and notebooks running Microsoft’s Windows 8 operating system isn’t any different.
Since its release users have reported random issues with not being able to download the update. Here’s what to do when Windows tells you your Windows 8.1 install couldn’t be completed.

Before proceeding, it’s a good idea to simply close the Windows Store app by clicking or tapping on its top and dragging it to the bottom of our screen. Then trying the update again. This could fix your issue and save you from having to proceed with the rest of this process. If that still hasn’t helped then continue.
The first thing you want to do if you see the error above on your screen is to restart your Windows 8 devices and try again. Remember to save any work you’ve been doing in the background before you restart first. After you’ve restarted, don’t open the Windows Store app.

If you’re still having trouble downloading the update. You’re going to need to open the Windows 8 Command Prompt. Go to the Start Screen by pressing the Windows key on your keyboard or by pressing the Windows button underneath your device’s display.

Right-click anywhere on the Start Screen and click on the All Apps button.
Now, find the Command Prompt option in the list of installed apps. Don’t left-click on it. Instead, right-click on it and select Run As Administrator from the menu on the bottom. Tablet users should place their finger on Command Prompt and then pull down on the app slightly to see the app menu.

In the menu type ‘net stop wuauserv’ then hit enter on your keyboard.

Now type ‘net stop bits’ then hit enter on your keyboard again.

Now open a file window by going back to the Desktop. Go the following location by manually typing it into the address bar or by copy and pasting it into the address bar in a file window: C:\Windows\SoftwareDistribution. Delete everything inside that folder.

Now go back to the Command Prompt and type in ‘net start wuauserv’ then hit enter.

Next type ‘net start bits’ then hit enter.

Now head to the Windows Store and attempt to download Windows 8.1 again.

By now, you should be able to download the Windows 8.1 without any issues. Remember to make sure you’re on a stable internet connection and that your Windows 8 device is plugged in.


Read More

26 Awesome Features in Windows 8.1


Microsoft has unleashed the Windows 8.1 – a glimpse of what Windows 8 users can expect this fall — now is a great time to try out the update if you have a machine that runs the operating system.
The new features in the Windows 8.1 range from changes to help users who don’t like the Start Screen, to updates for the users that do like it. It’s clear that Microsoft is moving to both make the transition to the Metro environment easier for users, while letting them have many of the comforts that they already enjoyed in previous versions of the operating system.

Windows 8.1 (Windows Blue) Is A Free Update To Windows 8
Read: How to Fix Windows 8.1 Update Issues


                                        The updated Start Screen in Windows 8.1

Windows 8.1 Feature Aims to Please Tablet Owners

Though the new of features coming in this update may entice users into updating to the 8.1  today, those who don’t wish to re-install their desktop and some of their Metro-style applications might want to hold off until that final release this fall — when they’ll be able to get it free of charge. The Windows 8.1 will work on Windows RT devices like the Microsoft Surface RT, and traditional Windows devices like laptops and desktops.
Here are the features you should be excited about in the Windows 8.1 , regardless of weather you enjoy using the operating system in its current shipping form, or if you weren't too fond of the user experience on the Windows device that your purchased between now and the Windows 8 launch last fall.

START SCREEN BACKGROUNDS

For many it’s not necessarily the Windows 8 Metro design language that bothers them so much as it’s the near complete lack of customization that’s available with the operating system. One of the biggest ways users customize their Windows device or, really, any device, is by adding their own background. In Windows 8.1 users will be have their desktop background also act as the background for the Start Screen.

START MENU

Though Microsoft won’t be making the traditional Start Menu from Windows 7 and earlier versions available in Windows 8.1, it will be tweaking the menu that appears when users right click on the Start Screen hot-corner or the new Windows button. Among the new options is an option to shut down the device.

Windows 8.1 brings back the start button.

START BUTTON

Though it won’t be turned on by default, Microsoft gives into users and return the Start button to its perch on the Windows task-bar in the Desktop interface. The operating system automatically hides the button if users begin to use the Windows key on their device instead of the button over time.

INTEGRATED BING SEARCH

Since it first relaunched its search engine as Bing in 2010, Microsoft has been dead set on embedding the product into everything that it offers consumers. In Windows 8.1 Bing actively searches the web whenever someone uses the Search Charm and even pull all the different types of results the user might find relevant.

Bing is integrated in Windows 8.1

REVAMPED WINDOWS STORE

By most accounts, the Windows Store as it is today is a horrific miss-mash of poor user experience design and white backgrounds. The new Windows Store app for Windows 8.1 finally puts an end to the absolutely ridiculous amount of horizontal scrolling that users have to put up with today, and feature more areas for the company to showcase well designed applications.

NEW START MENU SETTINGS

The only thing that seemed to be more frustrating to users then finding where to shut down their device in Windows 8 was the seriously annoying process of navigating to the Settings app only to discover that the feature they were trying to manage could only be changed in the Desktop interface’s Control Panel. With Windows 8.1 Microsoft has moved even more of these settings to the Settings app, cutting down on the amount of time users have to waste figuring out which settings interface to use.

LOCK SCREEN SIDESHOWS

While the iPad allows users to effectively use its screen as a digital photo frame, the new Lock screen in Windows 8 hasn’t… until this release. More customization and personalization without even having to unlock the device? That’s progress.

More Start screen color options in Windows 8.1.

MORE START SCREEN COLOR OPTIONS

The only thing was more depressing than not being able to use a photo as a Start Screen background was the serious lack of color options that Microsoft included in Windows 8. Instead of limiting you to color and accent combinations, users can choose the colors that work best for them.

BOOT TO DESKTOP

After hearing a very vocal subset of users complain about Microsoft forcing them to look at the Start Screen before they had the opportunity to hit the Desktop tile, users of Windows 8.1 will be able to boot directly into the Desktop. They’ll still have to look at the Start Screen for some things but at least, this is a nice middle ground. The setting is off by default.

INTERNET EXPLORER 11

Included in Windows 8.1  another version of Microsoft’s Internet Explorer web browser: IE 11. In IE 11 users will find a rendering engine that has moved even further to support current web standards. Better standards support, plus faster rendering and the ability to open multiple instances of the Metro version of Internet Explorer to use side-by-side is well worth the upgrade to Windows 8.1 itself.

SNAPPED STATES

While Windows 8 already supports opening more than one application at a time on devices that have a display resolution at or above 1366 x 768 pixels, it currently limits the user to just two applications. Neither application can take up one half of the screen. Instead, it’s locked at a 70%/30% ratio. Starting with Windows 8.1, users will now be able to re-size the amount of screen an application takes up to their hearts content, and they’ll be able to simultaneous look at as many apps as their display supports.

Change the size of Live Tiles in Windows 8.1.

RESIZABLE LIVE TILES

Microsoft introduces two new Live Tile sizes into the mix with Windows 8.1 so that that users can put more focus on the apps they care about and introduce a little more variety into the monotony of their Start Screens. Options will include tiles that are the size of four of Windows 8’s Live Tiles and another that’s just one-fourth the size of a small tile.

HELP TUTORIALS

Supplementing the welcome tutorial on each Windows 8.1 device is a Help application that guides users through the process of learning how the Start Screen and that systems that support it work. In theory, this should seriously improve out of box experience for a large swath of users who are new to the operating system.

XBOX MUSIC APP

Like the Windows Store app, the Xbox Music app in Windows 8 has been a testament to just how unfriendly some Metro-style applications can be. Along with Windows 8.1, Microsoft completely revamped the user interface of the Xbox Music application to better allow users to focus on their collection and easily build one up using the Xbox Music Pass subscription service.

NEW APPS

Starting with Windows 8.1, an Alarm application, sound recorder and video editing application comes pre-installed with the operating system. First-party applications to do these things are only available in the Windows Desktop interface.

OUTLOOK RT

Every Windows RT device already includes a version of Microsoft’s Office suite of productivity applications. Unfortunately, right now the lineup of Office for Windows RT only includes Word, Excel, PowerPoint and OneNote. With Windows 8.1, Windows RT users will now be able to manage their calendar and email using a native version of Microsoft Outlook.

FINGERPRINT SUPPORT

Though fingerprint readers have come pre-installed on Windows devices for nearly a decade, Microsoft hasn't ever moved to support the peripheral directly in the operating system. Instead companies like Dell and HP have relied on the sometimes questionable drivers to power the feature. Not only Microsoft move support for bio-metric technology into Windows 8.1, it allows users to actually encrypt specific files and folders using their fingerprint.

DEFAULT DRIVE ENCRYPTION

Microsoft has included hardware encryption technology in the Windows operating system since Windows 7, however with Windows 8.1 Bit-locker drive encryption is now turned on by default.

PHOTO EDITING

As camera optics get better, users are increasingly turning to whatever devices they have near them to capture their favorite moments. Windows 8 included a very nice Photo browsing application that pulled down images stored on Flickr, Facebook and SkyDrive. With Windows 8.1 users will be able to capture and quickly edit photos, all from the Metro-environment.

SYNCED APPS ACROSS DEVICES

With the SkyDrive settings syncing include in Windows 8, it’s clear that Microsoft is moving to make users Windows transition to other Windows powered devices as easy as it possibly can. Now when users move between devices their applications will go with them. In effect users will be able use their apps and services no matter what Windows device they are on.

FILE EXPLORER

In another bid to encourage users to stay away from the Desktop environment, a new File Explorer application will allow users to copy, move and create files and folders straight from the Metro environment. That’s one less reason to go anywhere near that Desktop tile.

In Windows 8.1 SkyDrive is built-in.

BUILT-IN SKYDRIVE

With the Windows 8.1 update the installation of the SkyDrive Desktop app is a thing of the past. Not only will the operating system back up user’s information automatically, it’ll do so without having to maintain two separate applications for both the Desktop and Metro environment. Everything will be surfaced in the system’s file explorer and users will be able to purchase even more storage from the operating system’s settings area.

LOCK SCREEN ALARMS & ADDED DETAILED STATUS

In addition to heralding, Windows 8.1 users will now be able to specify an alarm application that will surface on their lock screen alongside the applications that they've already chosen to get alerts from.

BETTER PORTRAIT SUPPORT FOR TABLETS

Likely due in part to its support for smaller 7” inch and 8” displays, Microsoft has re-architected the Start Screen and all of the included applications in Windows 8.1 to allow for better use when tablets are used in portrait mode. That’s huge since most of these devices will likely be used in that orientation with one hand. Right now, that’s something that Windows 8 fails miserably at.

DISABLING HOT CORNERS

Now, users can trigger certain user interface elements like the Windows 8 task manager and Charms Bar by putting their mouse in a particular corner.  Starting with Windows 8.1, users can turn this off.

AUTOMATIC APP UPDATES

Though automatic app updates have been available to Android users for some time, Windows 8 didn’t ship with that feature. Instead users had to manually trigger application updates from within the Windows Store. Thankfully, like Apple’s iOS 7, Windows 8.1 will download and install application updates itself, silently.

...!!!


Read More

Thursday, 13 March 2014

4 Ways to Boot into Safe Mode in Windows 8

Are you struggling to boot into Safe Mode in Windows 8 or Windows 8.1?
Have you tried pressing both F8 and Shift+F8 and they don't work? That's because a lot has changed with the boot procedure in Windows 8 and Windows 8.1. The boot has become so fast that it literally cannot be interrupted by any of your keypresses. Here are 4 ways in which you can boot into Safe Mode, that don't involve any special hacks or manual configuration.

Safe Mode in Windows 8 and Windows 8.1

Safe Mode in Windows 8 and Windows 8.1 is not too different from the Safe Mode found in earlier versions of Windows.


The operating system still loads only the most basic drivers and services, so that it can display a minimal useful interface. The only important difference is that the minimum screen resolution used by Safe Mode has risen from 800x600 pixels to 1024x768 pixels.

1. Use the System Configuration Tool (msconfig.exe) - works in Windows 8 & 8.1

The easiest method for booting into Safe Mode is to use the System Configuration tool, also known as msconfig.exe.
Go to the Boot tab and, in the Boot options section check the box that says "Safe boot". Then, click or tap OK.


You are informed that you need to restart your computer. Click Restart or Exit without restartdepending on whether you want to restart now or later.


At the next restart, Windows 8 and Windows 8.1 start in Safe Mode.

2. Use Shift + Restart - works in Windows 8 & 8.1

Another method is to press the Power button at the Windows login screen or in the Settings charm. Then, press and hold the SHIFT key on your keyboard and click Restart.


Windows asks you to choose an option. Press Troubleshoot.


In the Troubleshoot screen, press Advanced options.


In the Advanced options screen, press Startup Settings.


You are informed that you are about to restart in order to change several Windows options, including enabling Safe Mode. Press Restart.


Your computer or device restarts again and displays nine startup settings, including Safe Mode, Safe Mode with Networking and Safe Mode with Command Prompt.


Press the F4 key on your keyboard, to enable Safe Mode, F5 to enable Safe Mode with Networking and F6 to enable Safe Mode with Command Prompt. Windows 8 and Windows 8.1 now boot according to the setting you selected.

3. Boot from a System Recovery CD/DVD - works only in Windows 8

In Windows 8, but not in Windows 8.1, you can create a system recovery CD or DVD.
Once you have that disc created, boot from it. When asked to press any key to load its content, do so.
First, you are asked to choose your keyboard layout. Press the layout you want to use. If you want to browse through the available options, press "See more keyboard layouts" until you find the one you want to use.


Then, the Choose an option screen is shown.


From here on, the steps are identical to those shown for method 2.

4. Use F8 or Shift + F8 (doesn't work when using UEFI BIOS & SSDs)

In Windows 7, you were able to press F8 just before Windows got loaded, to open theAdvanced Boot Options window, where you could choose to start Windows 7 in Safe Mode.

Some websites advise you to press Shift+F8, just before Windows 8 or 8.1 starts loading so that you make it start the recovery mode, from where you can boot into Safe Mode. The problem is that, most times, Shift+F8 and F8 don't work, even though they are correct commands, supported by Windows 8 and Windows 8.1.

This official blog post from Microsoft (Designing for PCs that boot faster than ever before) explains that this behavior is caused by their work in designing a very fast boot procedure. Both Windows 8 and Windows 8.1 have the fastest boot times ever. To quote Steve Sinofsky:

"Windows 8 has a problem – it really can boot up too quickly. So quickly, in fact, that there is no longer time for anything to interrupt boot. When you turn on a Windows 8 PC, there's no longer long enough to detect keystrokes like F2 or F8, much less time to read a message such as "Press F2 for Setup." For the first time in decades, you will no longer be able to interrupt boot and tell your PC to do anything different than what it was already expecting to do."

If you have modern PC with a UEFI BIOS and a fast SSD drive, there's no way you can interrupt the boot procedure with your keypresses. On older PCs, with a classic BIOS and no SSD drive, pressing these keys might still work though.

Read More

Thursday, 13 February 2014

Outlook 2010: How to set out of office in outlook 2010?

Set out of office with Out of Office Assistant using Exchange Account


If you are using an Exchange account, you can auto reply a specified message for the received emails with setting theOut of Office Assistant while you are away. Please do as follows:
1. Click File button in the upper-left corner in outlook 2010, and click Info > Automatic Replies, see screenshot:
2010-out-of-office
Note: If you do not see this Automatic Replies option, your outlook have not connected to an Exchange Server.
2. In the Automatic Replies dialog box, select the Send automatic replies:
  • (1.) Check the Only send during this time range, and then specify the Start time and End time you need to auto reply the message.
  • (2.) Then type your message at the space box.


3. If you want to send auto-reply message to external senders, click on the Outside My Organization tab and check the Auto-reply to people outside my organization option. See screenshot:
4. Click OK to activate the out of office message.

 Set out of office with Manage Rules & Alerts function using other Accounts

If your outlook haven’t connected to an Exchange Server, the above method will not work. In this situation, the Manage Rules & Alerts function of Outlook can help you to set out of office auto reply as following steps:
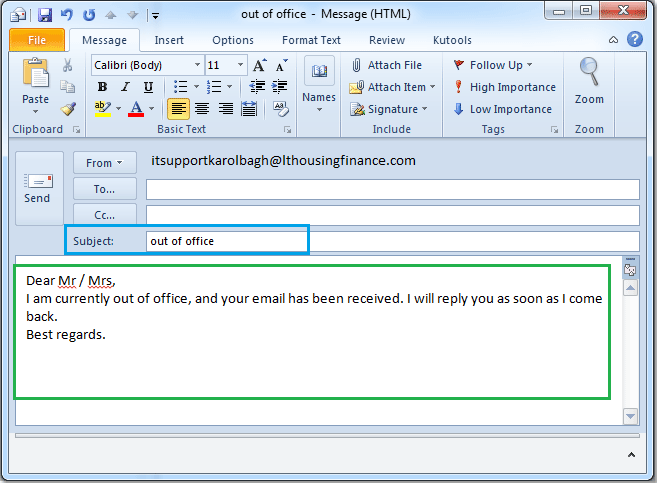
1. Click Home > New E-mail to create a new message, type the subject and message as you need. See screenshot:

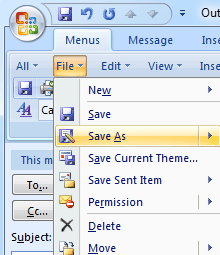
2. Then click File > Save As, choose a folder to put the message, and then click Save as type drop down list, and select Outlook Template.
doc-2010-out-of-office5
3. And then click Save to save the message.
4. Then click Home > Rules > Manage Rules & Alerts, see screenshot:
doc-2010-out-of-office6
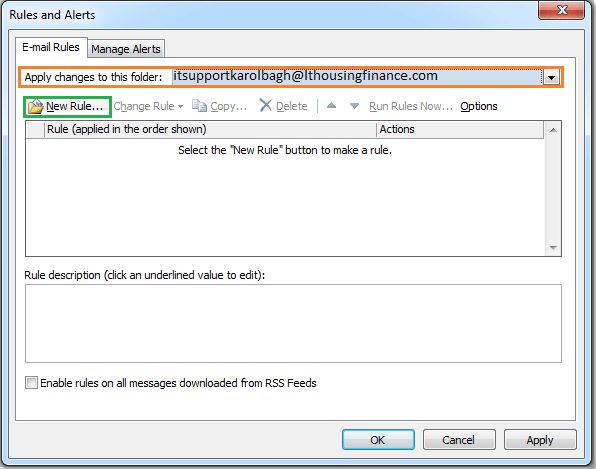
5. In the Rules and Alerts wizard, click E-mail Rules tab, and select the email account that you want to apply the out of office setting from Apply changes to this folder, and then click New Rule.


6. In the Rules Wizard, click Apply rule on message I receive from the Start from a blank rule section.
doc-2010-out-of-office8
7. Click Next button, check sent only to me from Which conditions do you want to check?
doc-2010-out-of-office9
8. Go on clicking Next:
  • (1.) Check reply using a specific template from What do you want to do with the message?
  • (2.) Then click a specific template hyperlink in the Edit the rule description section.
  • (3.) And a Select a Reply Template dialog box will appear, select User Templates in File System from Look indrop down list, and then click Browse button to choose the folder that you put the auto-reply message, and the message you created just now have been inserted. Then click Open to finish this step, see screenshots:
doc-2010-out-of-office10
-1
doc-2010-out-of-office11
9. Go on Next, in this Are there any exceptions step, you needn’t check any item.
doc-2010-out-of-office12
10. And click Next, enter a name for the rule in Step1 section, and specify the rule options as you need in Step2section.
doc-2010-out-of-office13
11. And then click Finish button to finish setting this auto reply rule. And when you receive some emails next time, the Outlook will reply them automatically at once.
Read More

How to Set Out of Office (Auto Reply) in Outlook 2003, 2007, 2010 and 2013

The following instruction is fit for Outlook 2003 and 2007 for both with and without Exchange Server.
It is also fit for Outlook 2010 and 2013 without Exchange Server.
If your email account is connecting to Microsoft Exchange Server, please click here.


Step 1: Create a New mail message. You should type some text in this mail, for example:

Out of Office Auto-reply
Thank you for your email. I’m out of the office and will be back at February 25. During this period I will have Limited access to my email. For immediate assistance please contact me on my cell phone at 123456879.


Step 2: Click File > Save As to save the message as Outlook Template.

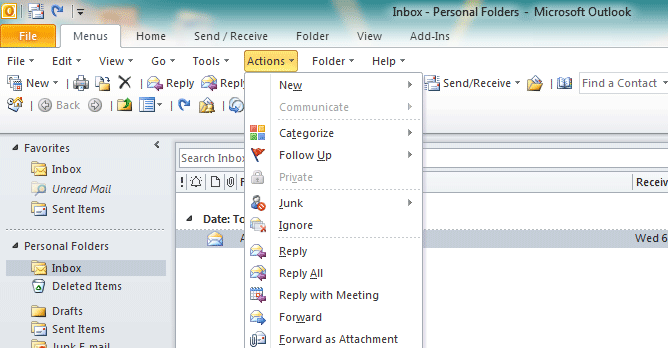
Note: The screen shot is fit for Outlook 2003. It is also fit for Outlook 2007 (with Classic Menu for Office installed).

If you are using Outlook 2007 and have not Classic Menu for Office, please click the Office Button on the top-left and select "Save As".

If you are using Outlook 2010/2013 and have not Classic Menu for Office, please click the File tab on the top-left and select "Save As".

Tip: Classic Menu for Office is a standard add-in which shows classic user interface in Office 2007 and 2010.


Step 3: Select "Outlook Template", click Save button.


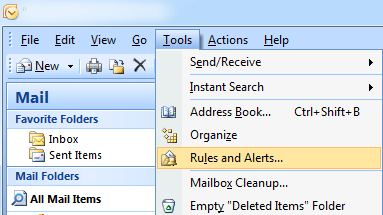
Step 4: Close the mail message and Click Tools > Rules and Alerts.

Note: The screen shot is fit for Outlook 2003 and 2007. It is also fit for Outlook 2010/2013 (with Classic Menu for Office installed).

if you are using Outlook 2010/2013 and have not Classic Menu for Office, please click the File tab on the top-left, and then click Info > Rules and Alerts..

Tip: Classic Menu for Office is a standard add-in which shows classic user interface in Office 2007 and 2010.


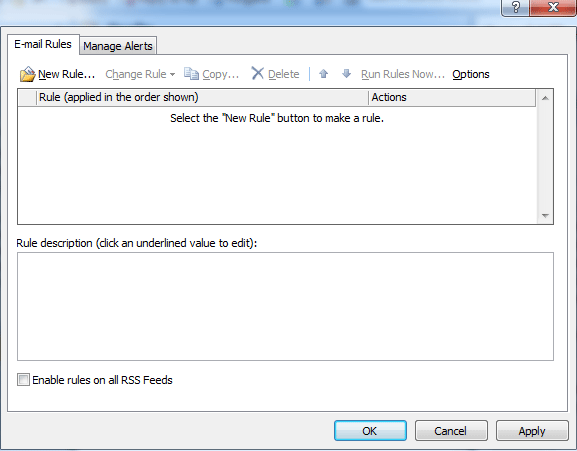
Step 5: Click New Rule.


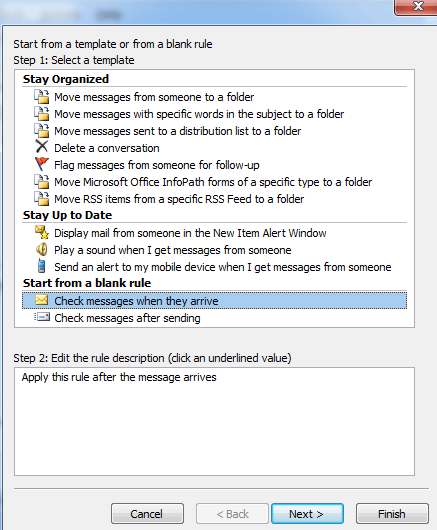
Step 6: Select Check messages when they arrive and click Next button.


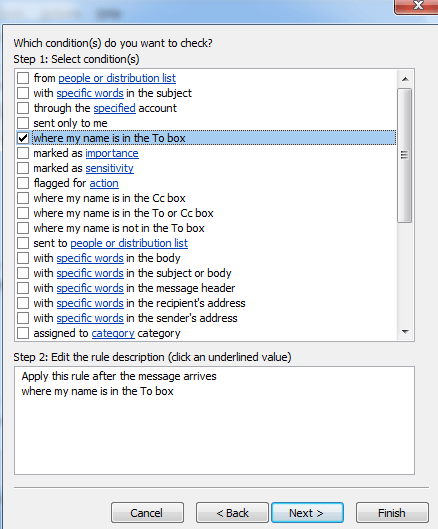
Step 7: Check where my name is in the To box and click Next button.


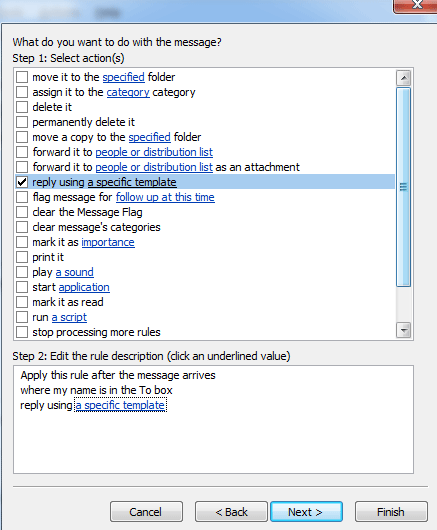
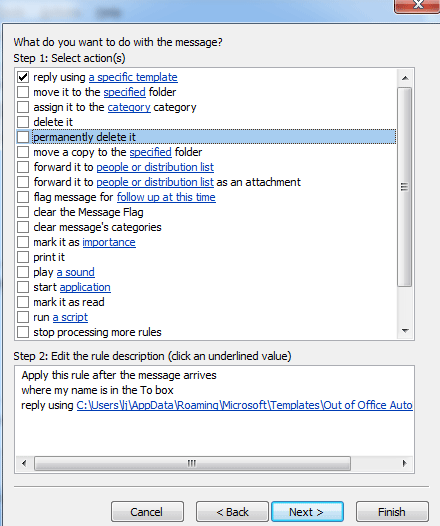
Step 8: Check reply using a specific template. And then click the label "a specific template" under "Step 2" to select template.


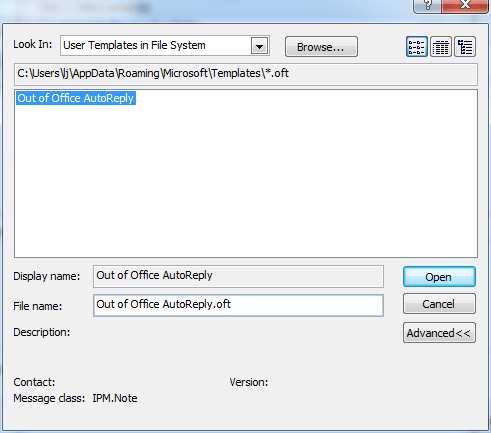
Step 9: Select "User Templates in File System" on the right of "Look In", the template "Out of Office AutoReply" which you saved will be here.

Select it and click Open button.


Step 10: Click Next button.


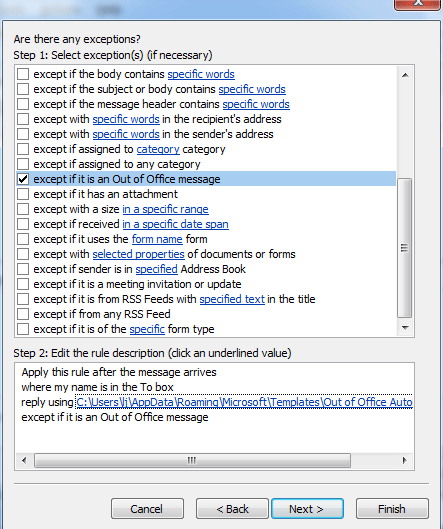
Step 11: Check except if it is an Out of Office message. Click Next button.


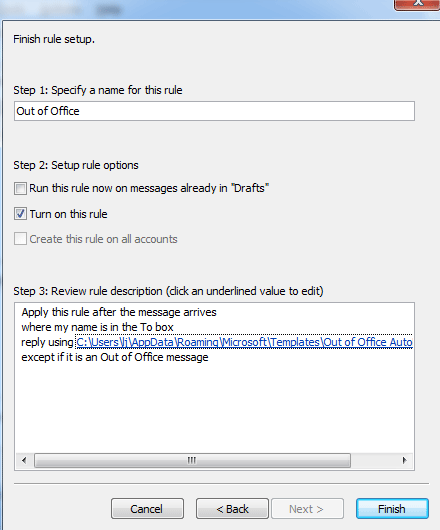
Step 12: Type "Out of Office" in the edit box to regard it as rule name. Click Finish button. it is OK now.


Here you have done. Now when you receive some emails next time, the Outlook will reply them automatically at once......


What is Classic Menu for Office/Outlook


Brings the familiar classic menus and toolbars back to Microsoft Office 2007, 2010 and 2013, helps users get through the transition from Office 2003 (or 2002, 2000) to Office 2007, 2010 or 2013, and saves your money and energy on training if you are upgrading your Office.


Download Here:- 

Classic Menu for Office 2007

Classic Menu for Office 2010 and 2013 (32-bit and 64-bit)


Also Check this one...

How to set out of office in outlook 2010 & 2013?


Read More